Recently I switched from Windows to Linux and looked for a solution to capture only specific application sounds. This was due to the fact that I seldomly stream (on twitch) and I don’t want music (or certain other sounds, such as discord) on my stream/VODs. On Windows I used a software called Virtual Audio Cable (VAC). This allowed me to use this audio stream in OBS Studio (OBS).
Sadly, VAC is not available for Linux, so I had to look for a different solution.
Jump right to the solution.
Getting started with PulseAudio
PulseAudio (PA) is a sound server which enables me to capture and merge audio streams from different applications. It’s often times already installed in different distributions.
Version check
In order to check whether PA is installed, open a terminal and enter pulseaudio --version and then hit enter. If PA is installed, you should get an output similar to this one:
pulseaudio 15.99.1
If it’s not installed, the output should be something like Command 'pulseaudio' not found.
Installation
In this case, you need to install PA. First update your repository and then install PA:
sudo apt update && sudo apt install -y pulseaudioAfter installing, you can check the version again. With pulseaudio --help you can check how to use it.
Configuring PulseAudio
Command line
It is possible to configure PA via command line, this has an immediate effect but is not persistent. It allows you to check whether your desired configuration is working. A good source for examples is the ArchLinux wiki.
Configuration file
The default configuration is stored in files /etc/pulse/default.pa. Personally I would advice against tampering with the default configuration file. I have created a default.pa file per user. The full path of this file would be ~/.config/pulse/default.pa.
Step by step
Include system wide defaults
In order to load the default configuration, you can include the system wide configuration file in your user file: .include /etc/pulse/default.pa
Create Virtual Speaker
Next, we want to create a virtual speaker. This will be used as output in our software which we want to record separately.
# Create Sink as Virtual Speaker
.ifexists module-null-sink.so
load-module module-null-sink sink_name=applicationsound sink_properties=device.description="ApplicationSound"
.endif
It’s pretty straight forward. the module module-null-sink will be loaded, if it exists. We give it a technical name (sink_name) and a description, which will be displayed in our software.
Next, we want to check whether our virtual speaker is being loaded. To do so, open a terminal and type the following:
pulseaudio -k
pacmd list-sinks | grep -e 'name:' -e 'index:'
The first command will kill the current process and it will be restarted with loading the adjusted config. The second command will list all sinks available, but only the index and name. This should result in something like this.

Note that in my case index 0 is denoted with an asterisk, which means that this is the default output. Furthermore we see that our virtual speaker is indeed listed with index 3. It should also be mentioned that you should address sinks and sources via the name, not the index, because the index can be switched around.
Now I did select the virtual speaker in Guild Wars 2 (GW2):

Create loopback
After creating the sink we could stop and start using the virtual speaker, we wouldn’t be able to listen to it though. In order to fix that, we create a loopback to merge the virtual speaker with our desired output. To get the name of our output we need to use the command, which we used when we checked whether our virtual speaker was created: pacmd list-sinks | grep -e 'name:' -e 'index:'
# Create loopback so that Application sound is heard in default device
.ifexists module-loopback.so
load-module module-loopback source=applicationsound.monitor sink=alsa_output.usb-Logitech_G533_Gaming_Headset-00.analog-stereo
.endif
Again, it is straight forward, we load the module module-loopback, if it exists and then define our source and the desired sink. Note that the source is the monitor of our virtual speaker (applicationsound.monitor) and in my case I used my default output sink, which, of course, you need to replace with your output name.
In order to check our configuration, we can restart PA and start its volume control.
pulseaudio -k
pavucontrol &
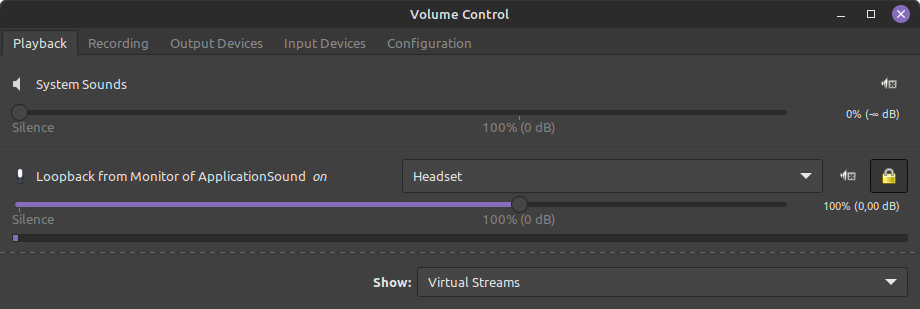
I did select the virtual speaker in GW2 and started the game in order to have something to play on the virtual speaker. So in the Playback tab of my volume control I see this:

Note that the drop down says Headset and not G533 etc. This is due to the fact that I renamed my headset in the config file. In addition, this tab allows you to manually select any output for your playbacks. This is useful for applications (i.e. ANNO1800) where are not able to select an audio output via the application itself.
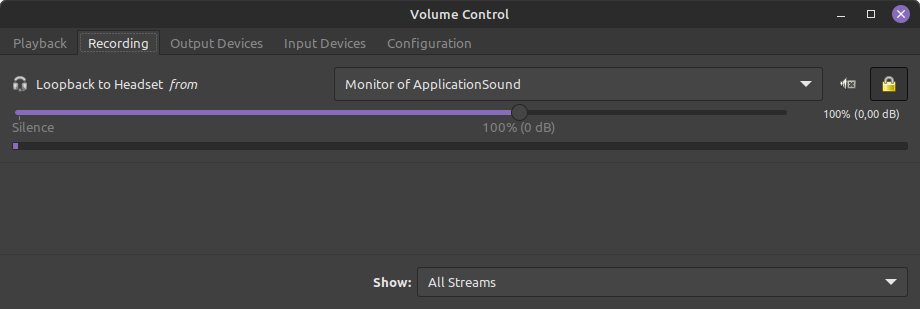
Lastly we want to check the Recording tab. Here we see the loopback as well. This is basically the reverse view of the Playback tab.

Complete default.pa file
.include /etc/pulse/default.pa

# Create Sink as Virtual Speaker
.ifexists module-null-sink.so
load-module module-null-sink sink_name=applicationsound sink_properties=device.description="ApplicationSound"
.endif

# Create loopback so that Application sound is heard in default device
.ifexists module-loopback.so
load-module module-loopback source=applicationsound.monitor sink=alsa_output.usb-Logitech_G533_Gaming_Headset-00.analog-stereo
.endif
Use case
I use this configuration for streaming with OBS.

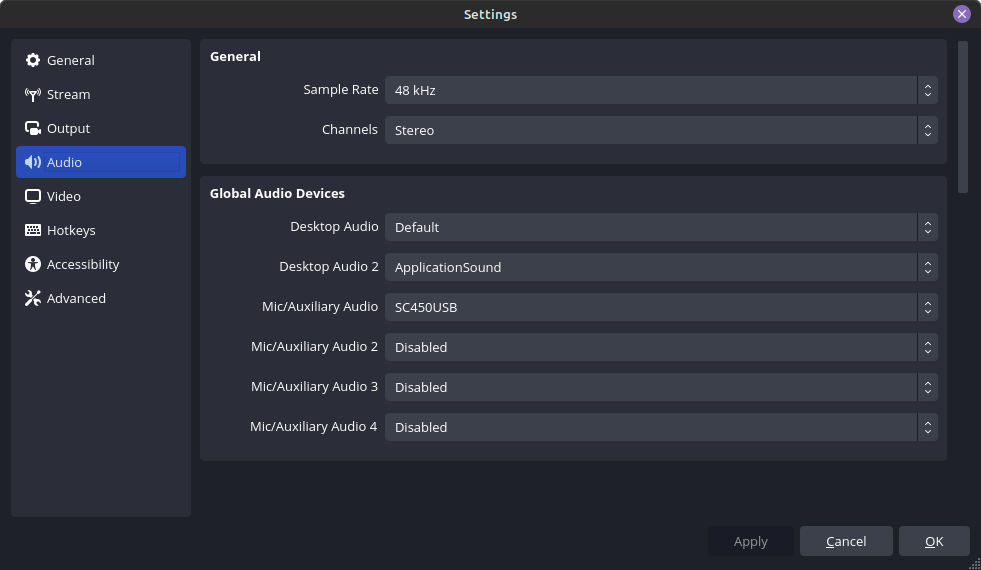
As you can see I use 2 different audio sources. My Desktop Audio is my default audio device, which is only used in audio track 1. This has, thanks to the loopback, my game audio included. The second output, named VOD, contains my game capture. This enables me to listen to music and not play it on stream, or play it on stream, but don’t save it in the VOD. Furthermore I can enhance this configuration to be able to don’t put people on discord on stream and so on.
You can see my OBS Audio Settings below:
